If you are sitting behind a proxy server you will probably have no internet connection in your Android emulator.

Solution: To configure your specific proxy settings, open Eclipse -> Run Configuration> Android Application > App > Target > Additional Emulator Command Line Options and add:

-http-proxy http://PROXY_PORT:PROXY_PORT

AJAX-Requests for local files are not working on Google Chrome.
XMLHttpRequest cannot load file:///Users/… . Origin null is not allowed by Access-Control-Allow-Origin
To bypass, either use a HTTP server or start Google Chrome with a command-line switch. Open the Terminal and type the command below:
/Applications/Google\ Chrome.app/Contents/MacOS/Google\ Chrome --allow-file-access-from-files
If you receive a message like:
XMLHttpRequest cannot load ... Cross origin requests are only supported for HTTP.
Open the Terminal and type the command below:
/Applications/Google\ Chrome.app/Contents/MacOS/Google\ Chrome --disable-web-security

As long as web security is disabled, it is not recommended to surf on public internet pages. In this mode your web browser is vulnerable for any kind of cross-site scripting.

For more information about Google Chrome command-line switches, take a look at Google Chrome command line switches.


Today I had a small problem - how to make hidden files and folders visible in Finder?

After some researches on the web, I found the following solution:

Open the Terminal and run the following command:
defaults write com.apple.finder AppleShowAllFiles TRUE
Before the changes will take effect, you need to restart Finder by running the following command:
killall Finder
Done!

To hide hidden files invisible again, open a Terminal and run the following command:
defaults write com.apple.finder AppleShowAllFiles FALSE
killall Finder


You want to use Time Machine over WIFI? - Then you have to buy a Time Capsule or you run a Time Machine at Ubuntu.

Tested with iOS 10.8.2 and Ubuntu Server 12.04

You did an unsuccessful installation before?

For the case that you did, remove Netatalk and all configuration files:
sudo apt-get remove --purge netatalk

Preparing the Ubuntu server...

From the Terminal (press + SPACE and type terminal) you have to run the following command to install Netatalk:
sudo apt-get install netatalk
Note: See also Netatalk HTML documentation for more details.
Configure the afpd server:
sudo vi /etc/netatalk/afpd.conf
Add the following line at the end of this file:
- -tcp -noddp -uamlist uams_dhx.so,uams_dhx2_passwd.so -nosavepassword
Check if CNID_METAD_RUN=yes in "/etc/default/netatalk" file. Otherwise change it. Create a new user for the Time Machine connect:
sudo adduser username
Go to the newly created user directory and create a backup folder there:
cd /home/username/
mkdir time_backup
sudo chown -R username:username time_backup
Configure the newly created backup directory in Netatalk:
sudo vi /etc/netatalk/AppleVolumes.default
At the end of the file you add the following entry:
/home/username/time_backup "My Time Machine Backup" allow:username cnidscheme:dbd volsizelimit:250000 options:usedots,upriv,tm
Make sure that you adjust the directory and username to your needs. With "volsizelimit" you can define the maximum size of the backup. In this case 250 GB.

After you are finished with all the configuration staff you need to restart the Netatalk service:
sudo service netatalk restart
Don't forget to allow afp if you are using ufw - Uncomplicated Firewall:
# Allow network access to the ports 548 and 427
sudo ufw allow 548
sudo ufw allow 427
sudo ufw disable && sudo ufw enable 

Preparing the Mac client...

To allow unsupported network volumes, you have to run the following command in Terminal (press + SPACE and type terminal):
defaults write com.apple.systempreferences TMShowUnsupportedNetworkVolumes 1
"Connect to your server" (open Finder and press + K) and type the address of your server:
afp://ip_address
Congrats, your Ubuntu server volume should be visible and ready for Time Machine usage now.
From the Terminal (press + SPACE and type terminal) you will run the following commands:
sudo apt-get install apache2
sudo apt-get install php5
sudo /etc/init.d/apache2 restart
Note: Your web folder is in "/var/www". If you restart the Apache HTTP Server you maybe get the following message:
* Restarting web server apache2                                                                                              apache2: Could not reliably determine the server's fully qualified domain name, using 127.0.1.1 for ServerName
 ... waiting apache2: Could not reliably determine the server's fully qualified domain name, using 127.0.1.1 for ServerName
The solution to fix it is really simple, you just add the ServerName directive to "/etc/apache2/httpd.conf":
sudo vi /etc/apache2/httpd.conf
Add the line: ServerName localhost

Finally restart the Apache HTTP Server:
sudo /etc/init.d/apache2 restart
done!


Well, there are many ways to access a Mac via remote desktop... I'll explain a very simple way here.

On your Mac, go to Settings -> Sharing -> Screen Sharing and enable the VNC option + a password. Make sure that you have enabled the Screen Sharing itself too.

That's it! Your Mac is ready for a VNC connection now.

If you want to connect to your Mac from another computer, you can use a client like http://www.realvnc.com/.
One of the most important features of style sheets is that they specify how a document is to be presented on different media: screen, beamer, printer, with a speech synthesizer etc.

When you take a look at the ICEfaces TLD Reference you will ascertain, that the media attribute is not supported for ice:outputStyle tag.

When you now say, no problem - I'll take the normal HTML "link"-tag to do the same, you are wrong. When you need components like ice:inputFile, you must define your style sheets with ice:outputStyle. Otherwise your iFrame (where the input file component is placed) will not include the style information from the top site.

Here are the things I would like you to focus on:
  1. Change component class
  2. Change renderer class
  3. Register the custom classes in faces config
  4. Test and Hints

Change component class

At first we need the OutputStyle class from  ICEfaces svn http://www.icefaces.org/main/community/svninfo.iface.

My examples are based on ICEfaces V1.8.2 RC2.

Todo:
  • set a private string member "media"
  • implement public getter and setter methods for media
  • extend the existing saveState and restoreState methods with some "media" stuff. That should be self explanatory.
Here is the new OutputStyle class:

package com.yourcompany.faces.custom.component;

// Version: MPL 1.1/GPL 2.0/LGPL 2.1
//
// "The contents of this file are subject to the Mozilla Public License
// Version 1.1 (the "License"); you may not use this file except in
// compliance with the License. You may obtain a copy of the License at
// http://www.mozilla.org/MPL/
//
// Software distributed under the License is distributed on an "AS IS"
// basis, WITHOUT WARRANTY OF ANY KIND, either express or implied. See the
// License for the specific language governing rights and limitations under
// the License.
//
// The Original Code is ICEfaces 1.5 open source software code, released
// November 5, 2006. The Initial Developer of the Original Code is ICEsoft
// Technologies Canada, Corp. Portions created by ICEsoft are Copyright (C)
// 2004-2006 ICEsoft Technologies Canada, Corp. All Rights Reserved.
//
// Contributor(s): _____________________.
//
// Alternatively, the contents of this file may be used under the terms of
// the GNU Lesser General Public License Version 2.1 or later (the "LGPL"
// License), in which case the provisions of the LGPL License are
// applicable instead of those above. If you wish to allow use of your
// version of this file only under the terms of the LGPL License and not to
// allow others to use your version of this file under the MPL, indicate
// your decision by deleting the provisions above and replace them with
// the notice and other provisions required by the LGPL License. If you do
// not delete the provisions above, a recipient may use your version of
// this file under either the MPL or the LGPL License."


import javax.faces.component.UIComponentBase;
import javax.faces.el.ValueBinding;
import javax.faces.context.FacesContext;

public class OutputStyle extends UIComponentBase {

    public static final String COMPONENT_TYPE =
            "com.icesoft.faces.OutputStyleComp";
    public static final String COMPONENT_FAMILY =
            "com.icesoft.faces.OutputStyle";
    public static final String DEFAULT_RENDERER_TYPE =
            "com.icesoft.faces.style.OutputStyleRenderer";

    private String href;
    private String userAgent;
    private String media;

    public OutputStyle() {
        super();
    }

    public String getFamily() {
        return COMPONENT_FAMILY;
    }

    public String getRendererType() {
        return DEFAULT_RENDERER_TYPE;
    }

    public String getHref() {
        if (href != null) {
            return href;
        }
        ValueBinding vb = getValueBinding("href");
        if (vb != null) {
            return (String) vb.getValue(getFacesContext());
        }
        return null;
    }

    public String getUserAgent() {
        return userAgent;
    }

    public void setUserAgent(String userAgent) {
        this.userAgent = userAgent;
    }
    
    
    public String getMedia() {
        return media;
    }

    public void setMedia(String media) {
        this.media = media;
    }

    public void setHref(String href) {
        this.href = href;
    }

    public Object saveState(FacesContext context) {
        Object values[] = new Object[5];
        values[0] = super.saveState(context);
        values[1] = href;
        values[2] = userAgent;
        values[3] = media;
        return ((Object) (values));
    }

    public void restoreState(FacesContext context, Object state) {
        Object values[] = (Object[]) state;
        super.restoreState(context, values[0]);
        href = (String) values[1];
        userAgent = (String) values[2];
        media = userAgent = (String) values[3];
    }
}

Change renderer class

Now we need the OutputStyleRenderer class from svn.

Todo:
  • Correct the import directive for OutputStyles so that are custom component is pointed
  • Enhance the encodeEnd method with the new media attribute logic.
  • extend the existing saveState and restoreState methods with some "media" stuff. That should be self explanatory.
Here is the whole OutputStyleRenderer class:
package com.yourcompany.faces.custom.renderer;

// Version: MPL 1.1/GPL 2.0/LGPL 2.1
//
// "The contents of this file are subject to the Mozilla Public License
// Version 1.1 (the "License"); you may not use this file except in
// compliance with the License. You may obtain a copy of the License at
// http://www.mozilla.org/MPL/
//
// Software distributed under the License is distributed on an "AS IS"
// basis, WITHOUT WARRANTY OF ANY KIND, either express or implied. See the
// License for the specific language governing rights and limitations under
// the License.
//
// The Original Code is ICEfaces 1.5 open source software code, released
// November 5, 2006. The Initial Developer of the Original Code is ICEsoft
// Technologies Canada, Corp. Portions created by ICEsoft are Copyright (C)
// 2004-2006 ICEsoft Technologies Canada, Corp. All Rights Reserved.
//
// Contributor(s): _____________________.
//
// Alternatively, the contents of this file may be used under the terms of
// the GNU Lesser General Public License Version 2.1 or later (the "LGPL"
// License), in which case the provisions of the LGPL License are
// applicable instead of those above. If you wish to allow use of your
// version of this file only under the terms of the LGPL License and not to
// allow others to use your version of this file under the MPL, indicate
// your decision by deleting the provisions above and replace them with
// the notice and other provisions required by the LGPL License. If you do
// not delete the provisions above, a recipient may use your version of
// this file under either the MPL or the LGPL License."

import com.icesoft.faces.context.DOMContext;
import com.icesoft.faces.renderkit.dom_html_basic.DomBasicRenderer;
import com.icesoft.faces.renderkit.dom_html_basic.HTML;
import com.icesoft.faces.util.CoreUtils;
import com.yourcompany.faces.custom.component.OutputStyle;

import org.apache.commons.logging.Log;
import org.apache.commons.logging.LogFactory;
import org.w3c.dom.Element;

import javax.faces.component.UIComponent;
import javax.faces.context.FacesContext;
import javax.servlet.http.HttpServletRequest;
import java.beans.Beans;
import java.io.IOException;

public class OutputStyleRenderer extends DomBasicRenderer {

    private static Log log = LogFactory.getLog(OutputStyleRenderer.class);
    private static final String IE_EXTENTION = "_ie";
    private static final String IE_7_EXTENTION = "_ie7";
    private static final String IE_8_EXTENSION = "_ie8";
    private static final String SAFARI_EXTENTION = "_safari";
    private static final String SAFARI_MOBILE_EXTENTION = "_safarimobile";
    private static final String CSS_EXTENTION = ".css";
    private static final String DT_EXTENTION = "_dt";
    private static final String OPERA_EXTENTION = "_opera";
    private static final String OPERA_MOBILE_EXTENTION = "_operamobile";

    private static final int DEFAULT_TYPE = 0;
    private static final int IE = 1;
    private static final int SAFARI = 2;
    private static final int DT = 3;
    private static final int IE_7 = 4;
    private static final int SAFARI_MOBILE = 5;
    private static final int OPERA = 6;
    private static final int OPERA_MOBILE = 7;
    private static final int IE_8 = 8;

    public void encodeEnd(FacesContext facesContext, UIComponent uiComponent)
            throws IOException {
        validateParameters(facesContext, uiComponent, OutputStyle.class);
        try {
            DOMContext domContext =
                    DOMContext.attachDOMContext(facesContext, uiComponent);
            if (!domContext.isInitialized()) {
                OutputStyle outputStyle = (OutputStyle) uiComponent;
                Element styleEle = buildCssElement(domContext);
                String href = outputStyle.getHref();
                styleEle.setAttribute(HTML.HREF_ATTR, getResourceURL(facesContext,href));
                
                String media = outputStyle.getMedia();
                
                if(media != null) styleEle.setAttribute("media", getResourceURL(facesContext,media));
                
                domContext.setRootNode(styleEle);
                int browserType = browserType(facesContext, uiComponent);
                if (browserType != DEFAULT_TYPE) {
                    if (href.endsWith(CSS_EXTENTION)) {
                        int i = href.indexOf(CSS_EXTENTION);
                        if (i > 0) {
                            String start = href.substring(0, i);
                            Element ieStyleEle = buildCssElement(domContext);
                            String extention = IE_EXTENTION;
                            if (browserType == SAFARI) {
                                extention = SAFARI_EXTENTION;
                            }
                            if (browserType == DT) {
                                extention = DT_EXTENTION;
                            }
                            if(browserType == IE_7){
                                extention = IE_7_EXTENTION;
                            }
                            if(browserType == IE_8){
                                extention = IE_8_EXTENSION;
                            }
                            if(browserType == SAFARI_MOBILE){
                                extention = SAFARI_MOBILE_EXTENTION;
                            }
                            if(browserType == OPERA){
                                extention = OPERA_EXTENTION;
                            }
                            if(browserType == OPERA_MOBILE){
                                extention = OPERA_MOBILE_EXTENTION;
                            }
                            // W3C spec: To make a style sheet preferred, set the rel attribute to "stylesheet" and name the style sheet with the title attribute
                            ieStyleEle.setAttribute(HTML.TITLE_ATTR, extention);
                            String hrefURL = CoreUtils.resolveResourceURL(facesContext, start + extention + CSS_EXTENTION);
                            ieStyleEle.setAttribute(HTML.HREF_ATTR, hrefURL);
                            styleEle.getParentNode().appendChild(ieStyleEle);
                        } else {
                            throw new RuntimeException(
                                    "OutputStyle file attribute is too short. " +
                                    "Needs at least one character before .css. Current Value is [" +
                                    href + "]");
                        }
                    } else {
                        throw new RuntimeException(
                                "OutputStyle file attribute must end in .css. " +
                                "Current Value is [" + href + "]");
                    }
                }

            }
            domContext.stepOver();
        } catch (Exception e) {
            log.error("Error in OutputStyleRenderer", e);
        }
    }

    private Element buildCssElement(DOMContext domContext) {
        Element styleEle = domContext.createElement("link");
        styleEle.setAttribute(HTML.REL_ATTR, "stylesheet");
        styleEle.setAttribute(HTML.TYPE_ATTR, "text/css");
        return styleEle;
    }

    private int browserType(FacesContext facesContext, UIComponent uiComponent) {
        int result = DEFAULT_TYPE;
        String useragent = ((OutputStyle)uiComponent).getUserAgent();
        if(useragent != null){
            return _browserType(useragent);
        }

        Object o = facesContext.getExternalContext().getRequest();
        if (o != null) {
            if (o instanceof HttpServletRequest) {
                HttpServletRequest request = (HttpServletRequest) o;
                useragent = request.getHeader("user-agent");
                if(useragent == null){
                    useragent = ((OutputStyle)uiComponent).getUserAgent();
                }
                if(useragent == null){
                 if (log.isDebugEnabled()) {
                  log.debug("Not able to find user agent. Returning default");
                 }
                    return DEFAULT_TYPE;
                }
                if(((OutputStyle)uiComponent).getUserAgent() == null){
                    ((OutputStyle)uiComponent).setUserAgent(useragent.toLowerCase());
                }
                String user = useragent.toLowerCase();
                result = _browserType( user);

            } else {
             if (log.isDebugEnabled()) {
              log.debug(
                        "OutputStyleRenderer: Request is not HttpServletRequest. Its [" +
                        o.getClass().getName() + "]");
             }
            }
        } else {
         if (log.isDebugEnabled()) {
          log.debug(
                    "IceStyleReader: facesContext.getExternalContext().getRequest() is null");
         }
        }
        return result;
    }

    private int _browserType(String user) {
        int result = DEFAULT_TYPE;
        if (Beans.isDesignTime()) {
            result = DT;
        } else {
            if (user.indexOf("opera") < 0 && user.indexOf("msie") != -1) {
                result = IE;
                if(user.indexOf("msie 7") != -1){
                    result = IE_7;
                }
                if(user.indexOf("msie 8") != -1){
                    result = IE_8;
                }
            } else if (user.indexOf("safari") != -1) {
                result = SAFARI;
                if(user.indexOf("mobile") != -1) {
                    result = SAFARI_MOBILE;
                }
            } else if (user.indexOf("opera") != -1) {
                result = OPERA;
                if(user.indexOf("240x320") != -1) {
                    result = OPERA_MOBILE;
                }
            }
        }
        return result;
    }
}

Register the custom classes in faces config

The last step is to register our new logic in the faces-config.

<component>
  <description>Links one or more theme CSS files into the page</description>
  <display-name>Output Style</display-name>
  <component-type>com.icesoft.faces.OutputStyleComp</component-type>
  <component-class>com.yourcompany.faces.custom.component.OutputStyle</component-class>
  <component-extension>
   <base-component-type>com.sun.faces.Component</base-component-type>
   <component-family>com.icesoft.faces.OutputStyle</component-family>
   <renderer-type>com.yourcompany.faces.custom.renderer.OutputStyleRenderer</renderer-type>
  </component-extension>
</component>

<render-kit>
  <render-kit-id>ICEfacesRenderKit</render-kit-id>
  <render-kit-class>com.icesoft.faces.renderkit.D2DRenderKit</render-kit-class>
  <renderer>
   <component-family>com.icesoft.faces.OutputStyle</component-family>
   <renderer-type>com.icesoft.faces.style.OutputStyleRenderer</renderer-type>
   <renderer-class>com.yourcompany.faces.custom.renderer.OutputStyleRenderer</renderer-class>
  </renderer>
 </render-kit>

Test and Hints

When all changes are done the new tag should be avalaible now. Simply type in your template:

<ice:outputStyle href="/css/yourStyle.css" media="all"/>
<ice:outputStyle href="/css/yourPrintStyle.css" media="print"/>

Hint: When you want to use the media attribute in an iFrame component like ice:inputFile too, you need to modifiy some more things. In this case you've to modify the class InputFile and a re-build of the ICEfaces libs is essential.
ICEfaces is based on Prototype JavaScript-Library, but what when you want to use jQuery in your project too? - The trick is to define separate namespaces for each library, to prevent them from a clash.

The code snipped below shows how to do that:

<html>
 <head>
   <script src="prototype.js"></script>
   <script src="jquery.js"></script>
   <script>
     var $j = jQuery.noConflict();
     
     // Use jQuery via $j(...)
     $j(document).ready(function(){
       $j("div").hide();
     });
     
     // Use Prototype with $(...), etc.
     $('someid').hide();
   </script>
 </head>
 <body></body>
 </html>

For more details go to http://docs.jquery.com/Using_jQuery_with_Other_Libraries .


To enable the inspector you need to type the following in Terminal (press + SPACE and type terminal) once:
defaults write com.apple.Safari IncludeDebugMenu 1
Restart safari... You will now see the "Inspect Element" item in safari contextual menu.


Adding new directories to path variable is really simple under Mac OS X. Just follow the next few steps:
  1. Open the Terminal (press + SPACE and type terminal).
  2. Make sure that you are in your home directory
  3. Type:
    echo 'export PATH=YOURDIRECTORY:$PATH' >> ~/.profil
    • Don't forget to replace "YOURDIRECTORY" with your directory string. In example: /opt/local/bin
  4. Re-open the terminal.
The directory you added should be available in the path variable now.


When you have to access your Managed Bean in a servlet, it depends on the scope you set for the Bean.

Request-Scope:
HttpServletRequest httpRequest = (HttpServletRequest) request;

YourBean bean = (YourBean) request.getAttribute("yourBean");
Session-Scope:
HttpServletRequest httpRequest = (HttpServletRequest) request;
HttpSession httpSession = httpRequest.getSession();

YourBean bean = (YourBean) httpSession.getAttribute("yourBean");
Application-Scope:
HttpServletRequest httpRequest = (HttpServletRequest) request;
HttpSession httpSession = httpRequest.getSession();
ServletContext ctx = httpSession.getServletContext();

YourBean bean = (YourBean) ctx.getAttribute("yourBean");


Whenever you are developing a RIA application based on ICEfaces, you will most certainly ask yourself: "How do I load test my web app"? Here are the options you have:
  • spend some money and buy a tool like e.g. NeoLoad, which support frameworks like ICEfaces.
  • get yourself a valid EE subscription for ICEfaces, which already includes testing documentation like ICEpack (only available in Standard, Professional, Premium and Corporate Edition).
  • hire a Tech Support Team that professionally tests your web app.
  • invest your own time to develop a "Load Testing Plan" through jMeter, which would then be at no charge to you.
Keep in mind that "free of charge" does not necessarily mean that you are always getting the least expansive application.

Short Overview

Here are the things I would like you to focus on:
  1. Preparing jMeter
  2. Main problems while testing an ICEfaces web app
  3. Creating the basic test plan structure
  4. Recording your page clicks with or without "Think Times"
  5. Modifying your test records to meet your needs
  6. Automate the ICEfaces’ specific replacements in your "Test Plan"
  7. Run the test on jMeter
  8. Conclusion

Preparing jMeter...

First download jMeter from the official Apache site:
http://jakarta.apache.org/site/downloads/downloads_jmeter.cgi
Extract the downloaded archive and execute jMeter through "bin/jMeter(.*)". If you are not already familiar with jMeter I recommend you read the “Getting Started” guide at:
http://jakarta.apache.org/jmeter/usermanual/get-started.html
Tip:If you are using a proxy connection in your network environment you can add your proxy settings to the jMeter start script. Or just write e.g.:
jmeter -H yourProxyHost -P yourProxyPort


To keep it simple and comprehensible, I will use the "address demo" of ICEfaces to demonstrate the load testing procedure, (the address demo is included in all current ICEfaces Binary Packages, downloadable through the official ICEfaces site), but before we start, I like to address main problems which can occur while testing a web application based on ICEfaces.

Main problems while testing an ICEfaces web app

There are several problems when testing an ajax application: First you have to figure out which the dynamic content is in the http request and which one the static one is. When searching for information in the common forums you will mostly find “how to” questions for example: "How can I fetch the current user session", "Do I need the rand parameters", "What's about the container sessions" and so on... but no established test procedures. I have prepared a short list of what needs to be addressed prior to when sending a http request to the server:
  • ice.session
  • ice.view - Current view-id of ICEfaces
  • javax.faces.ViewState - javax.faces.ViewState field is written for both server and client side state saving. The content of the value attribute for the hidden field will be different between the settings.
Is a rand parameter really needed, I would say no since it doesn't change my current results. What about the container session-id of JSF? - Must not be set either, since it is automatically managed.
Ok, you say, now I know what must be changed, but where can I find what I need so I can replace it later? – Well, if you open your web app in your preferred browser (I would recommend Firefox with FireBug extension) and view the source code you will find something like this:

ice.session and ice.view are shown in the java script section....and this is it.
The last missing variable is "javax.faces.ViewState". You will find it in the same source document, simply search for "javax.faces.ViewState" and you should see a line that reads as follows:
<input type="hidden" name="javax.faces.ViewState" id="javax.faces.ViewState" value="1" />
Last but not least make sure that you have disabled the “Concurrent DOM Views”. This is really important, because “onunload()” is not called for simulated user (the method normally interact with ICEfaces for cleaning-up resources).
For more information see http://www.icefaces.org/docs/v1_8_2/htmlguide/devguide/keyConcepts11.html.

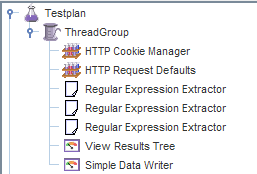
Creating the basic testplan structure

Using the information (about which content must be replaced) that we have gathered so far, we can start building the web test plan:
  1. right click on Testplan -> Add -> Thread (Users) -> Thread Group ("Thread Group" is also known as the "entry point" of a testplan).
  2. add the following child nodes to "Thread Group":
    • 1 x "HTTP Request Defaults"
    • 1 x "HTTP Cookie Manager"
    • 3 x "Regular Expression Extractor"
    • 1 x "View Result Tree"

Thread Group

The value for "Number of Threads" defines the simulated concurrent users. Ramp-Up defines with which amount delay the simulated users start their work.

HTTP Request Defaults

Enter your Server Name or IP and specify the port. For protocol, set value to "http".

HTTP Cookie Manager

The "cookie manager" is needed to support cookies in our test session. You can leave the cookie manager fields untouched.

Regular Expression Extractor

Here we define the logic to gain the dynamic variables values:

ice.session

  • Reference Name: iSession
  • Regular Expression: ,session: '(.+?)'
  • Template: $1$
  • Match No. : 0

ice.view

  • Reference Name: iView
  • Regular Expression: ,view: (.+?)
  • Template: $1$
  • Match No. : 0

javax.faces.ViewState

  • Reference Name: jView
  • Regular Expression: <input type="hidden" name="javax.faces.ViewState" id="javax.faces.ViewState" value="(.+?)" />
  • Template: $1$
  • Match No. : 0

View Result Tree

Add this listener in order to see all sample responses in a tree. No configuration needed.
Tip: Simple Data Writer: by adding this element you can write your results directly into a file. Next, you need to specify a directory and filename of the output file. Outputting the data via XML is a nice way for publishing your test results to customers; how this can be done - read on here: https://qants.wordpress.com/2009/08/28/jmeter-results-analysis-using-pivot-tables-in-excel
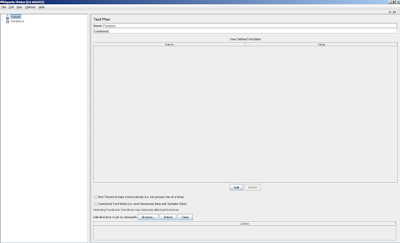
Finally, your resulting test plan should look like the following:

Recording your page clicks with or without "Think Times"

In the step before we finished with our initial test plan, so it's time for recording the stuff now :-) Ok, not yet. We need a record tool to do this - But no problem, jMeter gives us the power to do that without any third party products. Just go back to jMeter-GUI:
  1. Add a proxy (On Workbench, add -> none test element -> Http Proxy Server)

Http Proxy Server

To be defined:
  • Port: Use a free high-port (Ports greater than 1024), in example 9090
  • Target Controller: Select "Testplan > ThreadGroup"
With URL-Patterns we have the possibility to define what we want to record and what not. What we need:
  • file extension of our pages (normally extension is xhtml or iface)
  • "send-receive update" communication
That's it. In our case add the following entries to the include pattern:
  • .+\/address\/$
  • .+\/block\/send-receive-updates.*
  • .*\.iface
The first line depends on your web app name, second one is always the same. The third line depends on your file extension, in relation to "address demo" the extension is "iface".

Constant Timer for "Think Times" (optional)

If you want to record "think times" too, then the only thing you have to do is to add a constant timer (On Proxy, add -> Timer -> Constant Timer) with the value "${T}" in thread delay.
Your resulting workbench should look like the following:

Time for the Record...

Start your preferred web browser (I can't recommend IE here, it often crashes while recording), close all tabs (empty page). We have to configure the proxy connection first before we start recording. To do this, we use the proxy port number that we defined in jMeter "Http Proxy" before ("9090"). The next picture shows how to do this:

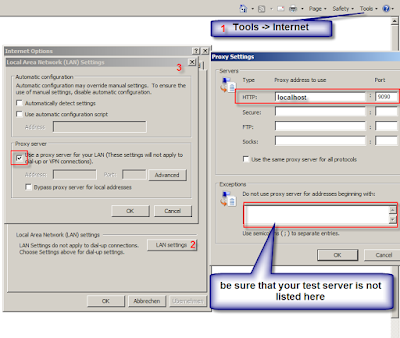
This step was shown on IE8 (yesss i tried it :-D), but it is still the same procedure on any other browser as FireFox, Opera, Chrome and so on. If the configuration work is done, switch back to jMeter and simply click the "Start Button" in "Http-Proxy" Tab. Next go to your browser and type in your test page address. Navigate through your test relevant pages... if you are finished, don't forget to click the stop button in jMeter. Your resulting Testplan should look like the following:

As you can see, our proxy recorded all HTTP-Requests and put them into our test plan. Ok, save the test plan now (make also a second backup of this plan).

Modifying your test records to meet your needs

This is one of the most important points. If we take a look at our recorded results we can see the parameters that we focused on before:

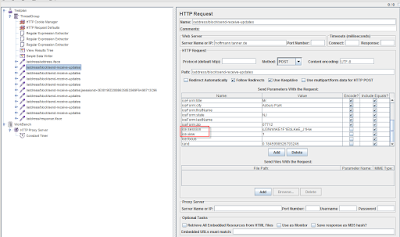
The manual steps would be, to search for every:
  • ice.session
  • ice.view
  • javax.faces.ViewState
in all http requests, and replace their values with the placeholders that we defined in the "Regex Extractors". For example: the value of ice.session must be replaced with "${iSession}", and so on. Just imagine what it takes time wise to do this on big site records - thus, I have worked out a smart solution.

Automate the ICEfaces specific replacements in your "Test Plan"

Remember, we saved the webtest-plan before. It is interesting to note, that the plan was saved in pure xml. So, I thought, cool... lets script some xslt to automate these boring and time wasting replacements. Download the XSLT 2 script here. For those people who are not familiar with XSLT, no worry there is really not much to do.
<?xml version="1.0" encoding="utf-8"?>
<xsl:stylesheet version="2.0" xmlns:xsl="http://www.w3.org/1999/XSL/Transform">
  <!--  ===========================  NaRo ============================ -->
  <!--  ============================================================== -->
  <!-- lobal variables -->
  <!--  ============================================================== -->
  <xsl:variable name="firstIDcollection">
    <xsl:copy-of select="//stringProp[preceding-sibling::stringProp='ice.session' and @name='Argument.value' and not(text()='${iSession}')]" />
  </xsl:variable>
  <xsl:variable name="firstID" select="$firstIDcollection/*[position()=1]" />
  <!--  ============================================================== -->
  <xsl:template match="/">
    <xsl:apply-templates />
  </xsl:template>
  <xsl:template match="*|@*">
    <xsl:copy>
      <xsl:apply-templates select="@*" />
      <xsl:apply-templates />
    </xsl:copy>
  </xsl:template>
  <xsl:template match="elementProp[@name=$firstID]">
    <xsl:copy>
      <xsl:attribute name="name">
        <xsl:value-of select="'${iSession}'" />
      </xsl:attribute>
      <xsl:apply-templates select="@*[not(name()='name')]" />
      <xsl:apply-templates />
    </xsl:copy>
  </xsl:template>
  <xsl:template match="stringProp[@name='Argument.value']">
    <xsl:choose>
      <xsl:when test="preceding-sibling::stringProp[@name='Argument.name' and text()='ice.session']">
        <xsl:copy>
          <xsl:copy-of select="@*" />
          <xsl:value-of select="'${iSession}'" />
        </xsl:copy>
      </xsl:when>
      <xsl:when test="preceding-sibling::stringProp[@name='Argument.name' and text()='ice.view']">
        <xsl:copy>
          <xsl:copy-of select="@*" />
          <xsl:value-of select="'${iView}'" />
        </xsl:copy>
      </xsl:when>
      <xsl:when test="preceding-sibling::stringProp[@name='Argument.name' and text()='javax.faces.ViewState']">
        <xsl:copy>
          <xsl:copy-of select="@*" />
          <xsl:value-of select="'${jView}'" />
        </xsl:copy>
      </xsl:when>
      <xsl:otherwise>
        <xsl:copy>
          <xsl:apply-templates select="@*" />
          <xsl:apply-templates />
        </xsl:copy>
      </xsl:otherwise>
    </xsl:choose>
  </xsl:template>
  <xsl:template match="stringProp[@name='Argument.name' and parent::elementProp[@name=$firstID] and text()=$firstID]">
    <xsl:copy>
      <xsl:apply-templates select="@*" />
      <xsl:value-of select="'${iSession}'" />
    </xsl:copy>
  </xsl:template>
</xsl:stylesheet>
  1. Go to http://saxon.sourceforge.net
  2. Download Saxon-HE for Java
  3. Extract it
  4. Create a directory somewhere on your disk and name it "convert". Be sure that there are no white-spaces in the path.
  5. Copy the saxon.jar from extracted folder to "convert"
  6. Copy your test plan and the (downloaded) XSL script to "convert" directory
  7. Open command line and switch to "convert" folder
  8. enter: "java -jar saxon9he.jar -t -s:yourTestplan.jmx -xsl:jmeter2iceMeter.xsl -o:newTestplan.jmx"
Now open newTestplan.jmx in jMeter again... and you will find that every replacement is done for you.

Run the test on jMeter

Well done, the main configuration work should now be done. You may want to increase the number of concurrent users in the Thread Group before starting your tests.
Tip: To add files, check the "Retrieve all embedded resources from html files"

Conclusion

If you know how to handle a session in test mode, it should not be very complicated to build it up. Please keep in mind that this solution can't replace a real user test scenario, but it may help to find out the bottle necks of your application and keep the costs low.
Improvements to this procedure are always welcome, so don't hesitate to comment on this or contact me if you think there is an error/mistake or sth. else. Happy Testing!